Are you eager to take your knitting skills to the next level? If so, then mastering the art of v-neck ribbing is just what you need! Adding a professional touch to your knitting projects can elevate them from ordinary to extraordinary.
In this article, we will guide you through the steps of perfecting v-neck ribbing in your knitting.
The first key to success is selecting the right yarn and needles. Choosing a yarn with good elasticity and stitch definition is crucial for achieving neat and polished ribbing. Additionally, using the appropriate needle size will ensure that your stitches are even and consistent.
Next, we will show you how to calculate the number of stitches needed for the ribbing portion of your v-neck. This step is essential for achieving a well-fitting neckline that lays flat against your body.
Once you have determined the stitch count, it’s time to start working on the ribbing pattern itself. We’ll provide you with some popular options that will add texture and visual interest to your garment.
Lastly, we’ll walk you through shaping the v-neck and adding those finishing touches that give it that professional flair. With our expert tips and guidance, you’ll be able to create stunning v-necks with perfectly executed ribbing every time.
So grab your needles and let’s get started on taking your knitting skills up a notch!
Key Takeaways
- Selecting the right yarn and needles is crucial for mastering v-neck ribbing
- Good elasticity and stitch definition are important qualities in yarn for v-neck ribbing
- Choosing the appropriate needle size ensures even and consistent stitches in v-neck ribbing
- Shaping the v-neck involves decreasing stitches at the center front for a gradual slope
Choose the Right Yarn and Needles
To perfect the v-neck ribbing in your knitting, you need to make sure you’re using the right yarn and needles for a seamless and professional finish.
Choosing the right yarn weight is crucial as it determines how your ribbing will drape and hold its shape. For a crisp and defined look, opt for a lighter weight yarn. On the other hand, if you prefer a softer and more relaxed appearance, go for a heavier yarn.
Additionally, consider the color of your yarn. A darker shade could add depth and sophistication to your v-neck ribbing, while a lighter hue might create a more delicate effect.
When it comes to selecting needle size and type, aim for ones that match your chosen yarn’s recommended gauge. This ensures that your stitches are even and consistent throughout the project. The type of needle can also impact the outcome of your v-neck ribbing. Circular needles are ideal as they allow you to knit in the round effortlessly without any seams to sew up later on.
By carefully considering these factors when choosing yarn weight and color, as well as needle size and type, you’ll be well on your way to achieving perfectly executed v-neck ribbing with a professional touch in your knitting projects.
Calculate the Number of Stitches for the Ribbing
Begin by calculating the number of stitches required for achieving the desired ribbing effect in your knitted project. This step is crucial in ensuring a professional finish to your v-neck ribbing.
To help you out, here are four important things to consider:
-
Ribbing Height: Determine how many rows of ribbing you want at the hem and cuffs of your garment.
-
Ribbing Width: Decide on the width of each rib stitch (usually 1×1 or 2×2).
-
Gauge Swatch: Knit a gauge swatch using your chosen yarn and needles to determine how many stitches per inch you achieve.
-
Ribbing Formula: Multiply the desired rib height in inches by the stitches per inch from your gauge swatch.
By following these steps, you can calculate the number of stitches needed for your perfect v-neck ribbing. Additionally, keep an eye out for common mistakes like twisted stitches or uneven tension that can affect the overall look of your finished project. Happy knitting!
Start with a Ribbing Pattern
Get ready to create a ribbing pattern that’ll make your knitting project stand out and give it a cozy, stylish look! When starting with a ribbing pattern, there are various variations you can choose from to add character and interest to your knitting.
You can experiment with different combinations of knit and purl stitches, such as the classic 1×1 or the more decorative 2×2 ribbing.
To achieve consistent tension in your ribbing, remember to pay attention to your gauge and adjust your needle size if necessary. It’s also helpful to maintain an even tension between your knit and purl stitches by keeping a relaxed grip on the yarn.
By following these tips and exploring different ribbing patterns, you’ll be able to add that professional touch to your knitting projects!
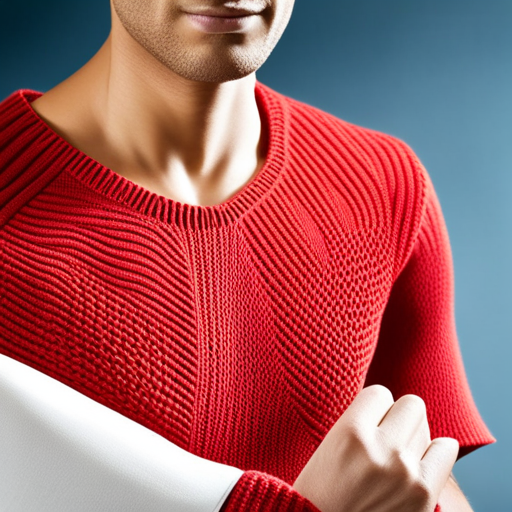
Shape the V-Neck
To shape the V-neck, you’ll start by decreasing stitches at the center front of your knitting. This will create a gradual slope for the neckline. As you decrease, you’ll need to keep in mind the desired depth and width of your V-neckline.
By shaping the V-neck, you can achieve a flattering and professional finish to your knitted garment.
Decreasing stitches
Mastering the art of decreasing stitches will give your v-neck ribbing a polished and refined look, leaving you feeling accomplished and proud of your knitting skills.
When it comes to improving stitch tension, decreasing stitches is crucial. By carefully reducing the number of stitches in each row, you can ensure that your v-neck ribbing maintains its shape and doesn’t become too loose or stretched out.
Additionally, decreasing stitches allows you to add decorative details to your knitting. You can create eye-catching patterns by strategically placing decreases in specific areas, such as at the center front or along the sides of the v-neck. This not only adds visual interest but also helps to maintain the symmetry and structure of your ribbing.
So take some time to practice this technique and elevate your v-neck ribbing to a whole new level of professionalism.
Shaping the V-neckline
Shaping the V-neckline can truly transform your knitting project and elevate it to a whole new level. To achieve the perfect V-neck, consider these tips for seamless v neck shaping:
-
Experiment with different V neckline variations: There are various ways to shape the neckline, such as a shallow V or a deeper plunge. Try out different options and see which one suits your style and garment design best.
-
Start shaping early: Begin decreasing stitches before reaching the actual V-neck point. This’ll create a smooth transition from the shoulders to the neckline, avoiding any abrupt changes in stitch count.
-
Gradual decreases: When shaping the actual V-neck, make sure to decrease gradually on each side of the center stitch. This’ll create a symmetrical and balanced look.
By following these tips, you can add that professional touch to your knitting project and ensure that your V-neck ribbing is flawless.
Finishing Touches
Enhance the overall look of your knitted v-neck by adding those exquisite finishing touches. Once you’ve shaped the neckline, it’s time to focus on giving it a polished appearance.
Start by using professional seaming techniques to join the shoulder seams and ensure a smooth transition from one side to the other. This will give your v-neck a clean finish and make it appear well-constructed.
After seaming, don’t forget to block your knitting. Blocking is essential in achieving a professional-looking garment as it helps even out any uneven stitches and gives the fabric a more refined drape. Use blocking methods such as wet blocking or steam blocking depending on the yarn you used for your project.
By paying attention to these finishing touches, you’ll elevate your knitted v-neck from homemade to high-end fashion piece.
Frequently Asked Questions
How do I prevent my V-neck ribbing from curling?
To prevent your v-neck ribbing from curling, try using a smaller needle size for the ribbing section. Additionally, consider adding a few rows of garter stitch or seed stitch at the beginning and end of the ribbing to improve stretchiness.
Can I use a different stitch pattern for the ribbing?
Yes, you have alternatives for the ribbing pattern. Pros: adding variety and personal touch. Cons: different patterns may not lay as flat, affecting the overall look of your v-neck ribbing.
How can I make my V-neck ribbing more stretchy?
To make your v-neck ribbing more stretchy, consider using a different stitch pattern like 1×1 or 2×2 ribbing. You can also make it reversible by adding decorative elements such as cables or lace.
Are there any alternative methods for shaping the V-neck?
To add color to v-neck ribbing, try using different colored yarns for each row or alternating colors within the rib pattern. For added texture, you can incorporate cables, lace motifs, or even bobbles into the ribbing.
What are some tips for blocking the finished V-neck ribbing?
When blocking the finished v-neck ribbing, choose a yarn that has good stitch definition and will hold its shape. Use blocking techniques like wet blocking or steam blocking to ensure the ribbing lays flat and looks professional.
Conclusion
So there you have it – a guide to perfecting the v-neck ribbing in your knitting. By choosing the right yarn and needles, calculating the number of stitches, starting with a ribbing pattern, and shaping the v-neck, you can add a professional touch to your knitting projects.
Don’t forget those finishing touches to make your v-neck ribbing stand out even more. With these tips in mind, you’ll be able to create beautiful and polished v-neck ribbing every time.
Happy knitting!